
I've just discovered that my "old blog" still exists in cyberspace and many of you may not be aware that I have a NEW website and a NEW blog! If you wish to still be one of my faithful "blog stalkers" please visit my new website at: https://www.cindyneedham.com/blogs/news and sign up using the new subscription button.
Thank you and if you have ANY questions please email me at: linenqltr@comcast.net.
Hugs, Cindy :)
Monday, October 17, 2016
Monday, September 19, 2016
Out with the old...

My favorite oldest daughter, Jenny, created my first website many years ago. She absolutely insisted I needed one and I couldn't figure out why. Seriously???? It has served me well and she has worked hard to keep it updated but I've outgrown it...it's time to move to a new "home".
My new website should be launched in the next 24-48 hours so please keep your eyes and ears open for an announcement of my move. It will still be cindyneedham.com. As always I love to receive feedback from all of you and look forward to hearing back on the pro's and con's. My old website, as well as my old blog will be disappearing once the new website is launched.
Thank you and I look forward to seeing you all in my new "home".
Hugs, Cindy
Sunday, August 21, 2016
GREAT blogpost-The Ultimate Shape

I just received an email from TheQuiltShopGal about a wonderful blogpost from Karin in Australia featuring my new Ultimate Shape Stencils. I was SO impressed, and knew you would be too, that I had to post it here too.
Click HERE to be taken to Karin's blogpost. It is quiltyarnblogspot.com.
Thank you Karin for your wonderful inspiration! Fabulous designs!
Hugs, Cindy
Tuesday, August 2, 2016
Introducing The Ultimate Shape!!! ~ Special Sale Thru August 6th~


I am VERY pleased to be introducing the newest member of my designing stencils collection...
The Ultimate Shape!
When I teach my design workshops I often talk about a very simple shape that I use to create overall designs simply by repeating the shape and filling it any way I wish. It was another one of those light bulb moments when I decided I should have this shape cut into stencils!
This designing stencil has been cut into four different sizes, i.e., 2", 4", 6" and 8" to accommodate most quilt blocks. The basic shape is a Cathedral Window with four arches and it also has horizontal, vertical and diagonal guidelines. It has been designed to allow you to use all of the guides or just one or two to create an unlimited number of custom quilting designs for both pieced and wholecloth quilts.


If you want to add an arch to a block and it is larger than The Ultimate Shape, simply center the stencil on your quilt block and then extend the arches to fit.

If you want to add an arch to a design and the stencil is too big, simply extend the stencil past the design as much as you need until the arch fits.


You can use the center lines as guides to fill the block with beautiful free form feathers...or any design you wish.

Look what happens when you use combine two sets of arches!

I got really crazy here and just used a corner of the stencil and repeated it to create this beautiful pinwheel. By the way, I used the angles on the circle Ultimate Stencil to line up these corners and it came out perfect.
I have a 38 page, full color e-book that accompanies the purchased set of four stencils that has oodles of instruction and illustrations showing how you can easily create your own beautiful quilting designs using just this one stencil in any of the four sizes. This book will be added as a separate chapter to the New & Improved design book and will continue to be updated with new designs.
I am running a five-day sale on this special set of stencils for $25 (normal retail is $30). I will include my 2-book set of quilting designs, New & Improved and Oldies but Goodies, FREE for this sale! These are e-books and will be sent to you within 24 hours of purchase. You will also receive by email the 38 page handbook that accompanies this set of four stencils. This sale will end at midnight on Saturday, August 6th.
Please click HERE to purchase the stencils and download the free 7-page handout.
Thank you very much for being one of my students, blog stalkers or retreaters! Please let me know if you have any questions. Hugs, Cindy :)
Email: linenqltr@comcast.net
Wednesday, July 27, 2016
Featuring Toni Tweedle Healy!!!

Congratulations Toni!!! I am sharing her story below...

(LINK to discount coupons for my Craftsy Classes)


Thanks for your inspiration, Cindy. You inspire me every day!
Tony Tweedle Healy
Tuesday, June 21, 2016
Quilt Shop Gal's Ultimate Free Motion Quilting Challenge!
I have known "Quilt Shop Gal", aka "Sew Cal Gal" for many years and have always been VERY impressed with the amount of time and effort she unselfishly devotes to educating and challenging quilters of all levels.
I first met her when I attended Diane Gaudynski's workshop at Asilomar several years ago when she embarked on her very own personal free motion quilting challenge. She went on a year-long journey where she set out to learn as much as she possibly could about free motion quilting from all types of instructors expanding her quilting and designing skills at the same time.
I was honored to have been invited to participate in a previous FMQ challenge she hosted a few years ago and am thrilled that she is once again featuring my Ultimate Stencils in yet another challenge she refers to as a "Linky Party" (LP). LP#1 was for those quilters with past projects using The Ultimate Stencils. LP #2 will raise awareness and inspiration with quilters sharing their doodles/sketches for both of my stencil collections. The 3rd LP will be for those that create with my stencils this summer. And not only is this a great quilting challenge she also has great prizes to win too!
If you're interested, please click on THIS LINK to be taken to the Linky Party headquarters!

Quilt Shop Gal also shared a blog post by Karin in Australia where she shared her beautiful quilt created with The Ultimate Stencil as well as The Ultimate Backgrounds. CLICK HERE to be taken to her post.
I just have to throw in a little teaser here! I've come up with another fabulous little stencil that I'm calling The Ultimate Shape. You will be able to use this special shape to create hundreds of block and border designs. I am having it cut into four different sizes, i.e., 2", 4", 6" and 8".
Quilting Creations is in the midst of cutting these and I am anticipating having a "Blessing Sale" in the middle of July to launch these to the world. This set will come with it's own free design book that will get the creative juices flowing.
If you are already participating in Quilt Shop Gal's Linky Party, or plan to join soon, please email me and share photos of your work. I would love to share what you you've come up with!
Hugs, Cindy :)
Saturday, June 11, 2016
Featuring Michiko Yonemaru..."Bouquet Blanc"

It is truly my pleasure to share the beautiful work of one of my favorite students, Michiko Yonemaru.
Two years ago I taught an Open Thread Bar workshop for the ASG in San Jose, California. Michiko was not a member of this group but bravely signed up and showed up with her huge Bernina which was bigger than she was. You have to understand she was a beginning student...no prior experience...but determined to learn. No one in the classroom knew who she was but they sure did when class was over!
Michiko is one of the few students I have taught over many years who has a natural talent to quilt. It was already inside her. I gave her a few tips and then watched her take off. She has joined me for multiple workshops over the past two years and each time she excels at what she does.
She recently joined me for my retreat at the Mercy Center in Auburn and I provided her with a challenge. I gave her two yards of my treasured smooth Dupioni silk and a book of French boutis patterns and gave her two years to work on a piece of her choice. Oh my.

Michiko took this challenge VERY seriously and put hundreds of hours into the quilting. Yes, there were a few hiccups along the way but that's how we all learn.


Thank you Michiko for allowing me to share you with the world. You have inspired all of us!
Hugs, Cindy :
Thursday, June 2, 2016
Timeless Treasure...Ramona Resurreccion!


I used your Ultimate Background grid for the background fillers which I'm so happy with. I have done some beading and covered cording which I cut into 200 pieces and attached them around the binding.

I hope I have done enough to enhance this linen. Cheers, Ramona
Friday, May 27, 2016
My Story Board
I already know the answer to the question but have you ever spotted some fabric and absolutely HAD to have it but didn't know why? And not only get that one piece of fabric but all the coordinating prints in that particular line????


Well I was perusing thru a quilt shop recently and saw the most beautiful fabric with stars, moons and fabulous houses all over it. The top two photos are showing the houses already cut off of the beautiful night sky (didn't think of taking pictures until it was too late!). This is a line of fabric from Windham Fabrics and is their "Story" collection by Carrie Bloomston. Oh my.
I've been looking for something very special to put by the front door in our studio and I thought it was a fabulous opportunity to create a very personal story board.
I backed the fabrics with a fusible web first.
 Word mountains were created from one of the fabrics...


And I slowly but surely started fussy cutting all the houses, fish, trees, dogs and people to create our family, our homes, our pets and our businesses.
 Our studio is filled with words...a theme of sorts...so cutting up this fabulous fabric and adding words and inspirations was perfect.


 After everything was fused and ironed I stretched it onto a stretch canvas and hot glued it to the back and proudly hung it by the front door of our studio. It was SO nice to take 3 afternoons off to do something totally "sandbox"...kind of good for the soul.

Hugs, Cindy :)


Well I was perusing thru a quilt shop recently and saw the most beautiful fabric with stars, moons and fabulous houses all over it. The top two photos are showing the houses already cut off of the beautiful night sky (didn't think of taking pictures until it was too late!). This is a line of fabric from Windham Fabrics and is their "Story" collection by Carrie Bloomston. Oh my.
I've been looking for something very special to put by the front door in our studio and I thought it was a fabulous opportunity to create a very personal story board.
I backed the fabrics with a fusible web first.


And I slowly but surely started fussy cutting all the houses, fish, trees, dogs and people to create our family, our homes, our pets and our businesses.


Hugs, Cindy :)
Thursday, April 21, 2016
Ultimate Stencil Handout...

I rewrote my handout for this lesson yesterday and made it much simpler and it dawned on me that many of you would like to have this same information. The only way I could figure out how to get this to you is to have you CLICK HERE. It will take you to the Ultimate Stencil part of my website. There is a date in blue, 4/21/16, and you can download the handout from there.
Hope this helps!!!! Let me know if you have any questions along the way.
Hugs, Cindy :)
Wednesday, April 20, 2016
"Sweet Dreams" Pillowcase Update

I'm very pleased with how this is turning out. It's nothing really fancy but often times "simply said is better said".


Hugs, Cindy :)
Wednesday, April 13, 2016
Pillowcase Quilt-Teaching Table for Houston

We all know we're NOT supposed to touch the quilts at Houston or any other show for that matter, but you know me, I like to be different! In addition to the primary quilts exhibited in the "For The Love of Linens" exhibit this year, I want to have 1-2 "teaching tables" where visitors can see AND touch smaller pieces. I'm going to call this the "Petting Zoo".
One of the pieces at the Zoo will be a pillowcase quilt. Vintage pillowcases are very common and the bottoms of them almost always have beautiful embroidery and lace work.
In the past I've created three different pillow case quilts and each time I've stuffed the intact pillowcase with Quilters Dream Cotton Request batting and was always challenged on how to finish the frilly ends. The folded sides and top always looked a bit awkward too.
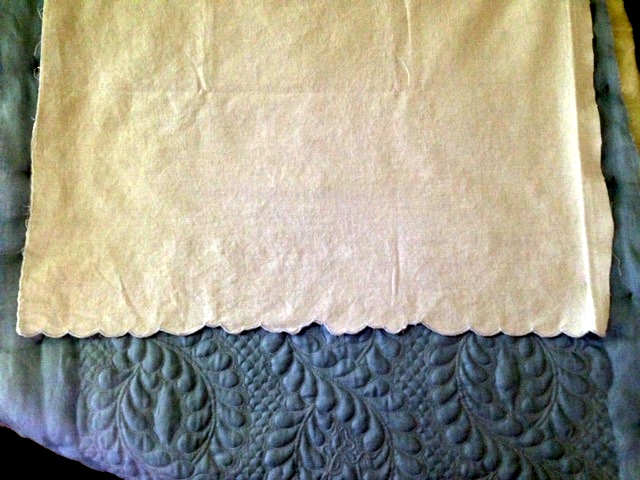
I finally had one of those "DUH" moments when I realized that I could disassemble the pillowcase and only use the front of it for the quilt. Layer it like a normal linen wholecloth quilt and then bind it. Now why didn't I think of this years ago????


So...I cut the pillowcase apart. I marked my design and then pin basted
four layers together...i.e., backing, Hobbs Heirloom wool batting,
white Dupioni silk for my underlayment and then the pillowcase on top.


The back of this piece is a beautiful dusty blue linen. I want this piece reversible so I am going to use Superior Threads' 40 wt. white Magnifico thread for the feathers and then the same Kimono silk for the background baby clams.
I am going to be creating some videos for The Quilt Show on how to do a pillowcase quilt. They are my co-sponsor for the exhibit and these will be shown on their blog as we get closer to the Houston show.
I will be featuring a few more pieces for the "Petting Zoo" in upcoming blog posts...stay tuned!!!
Hugs, Cindy :)
Subscribe to:
Posts (Atom)
